Securely Connect Remote IoT: Raspberry Pi, AWS VPC & Windows
In today's rapidly evolving digital landscape, the ability to seamlessly and securely connect remote IoT devices to cloud infrastructure is not just an advantage, but a fundamental necessity. Whether you're monitoring environmental sensors in a remote agricultural field, automating smart home tasks from afar, or deploying a fleet of industrial IoT solutions, ensuring the integrity and confidentiality of your data is paramount. This comprehensive guide will demystify the process of how to securely connect remote IoT VPC Raspberry Pi AWS download Windows, providing you with the expertise to build a robust and protected remote IoT ecosystem.
This article delves into the best practices for setting up a remote IoT system using a powerful combination: the versatile Raspberry Pi as your edge device, Amazon Web Services (AWS) Virtual Private Cloud (VPC) for a secure, isolated network environment, and your Windows PC as the control hub. We will explore everything you need to know about setting up a remote IoT environment, including downloading free Windows software, configuring SSH, and optimizing your setup for both performance and unyielding security. By the end of this guide, you’ll know exactly how to securely connect your IoT devices, manage them through AWS, and even handle necessary downloads on your Windows machine.
Table of Contents
- The Imperative of Secure IoT Connectivity
- Understanding the Core Components
- Preparing Your Raspberry Pi for Remote IoT
- Configuring AWS VPC for Secure IoT Communication
- Establishing Secure SSH Connection from Windows
- Managing and Optimizing Your Remote IoT System
- Troubleshooting Common Secure Connection Issues
- Future-Proofing Your IoT Security Posture
The Imperative of Secure IoT Connectivity
In today's interconnected world, the proliferation of Internet of Things (IoT) devices has transformed industries and daily lives. From smart cities to industrial automation, IoT is at the forefront of innovation. However, with this rapid expansion comes a critical challenge: security. Cyber threats are lurking around every corner, and an unsecured IoT device can become a significant vulnerability, potentially exposing sensitive data, enabling unauthorized access, or even serving as an entry point for broader network attacks. This is why the ability to securely connect remote IoT VPC Raspberry Pi AWS download Windows is not merely a technical exercise but a fundamental requirement for any responsible IoT deployment.
Whether you're managing a fleet of Raspberry Pi devices or integrating IoT solutions into your workflow, ensuring secure communication is paramount. An insecure connection can lead to data breaches, operational disruptions, and severe reputational damage. Our focus here is to equip you with the knowledge and tools to establish connections that are not only functional but also resilient against malicious actors. By leveraging the robust security features of AWS Virtual Private Cloud (VPC) in conjunction with the versatility of Raspberry Pi, and managing it all from your familiar Windows environment, you can build an IoT system that is both powerful and inherently secure.
Understanding the Core Components
Before we dive into the practical steps, it's crucial to understand the foundational technologies that make this secure remote IoT setup possible. Each component plays a vital role in ensuring your data remains private and your devices stay protected. This section will break down the key players: the Raspberry Pi, AWS VPC, and Secure Shell (SSH).
Raspberry Pi: The Versatile Edge Device
The Raspberry Pi, a series of small single-board computers, has become a cornerstone of IoT development due to its affordability, versatility, and robust community support. It's powerful enough to run various operating systems (typically Linux distributions like Raspberry Pi OS), execute complex scripts, and interface with a wide array of sensors and actuators. As an "edge device," the Raspberry Pi can process data locally before sending it to the cloud, reducing latency and bandwidth consumption. Its compact size and low power consumption make it ideal for remote deployments where space and power are limited. For our purposes, the Raspberry Pi will serve as the physical endpoint of our IoT system, collecting data and acting upon commands received from the cloud. Its widespread adoption means there's a wealth of resources available for setup and troubleshooting, making it an excellent choice for learning how to securely connect remote IoT VPC Raspberry Pi AWS download Windows.
AWS Virtual Private Cloud (VPC): Your Private Cloud Fortress
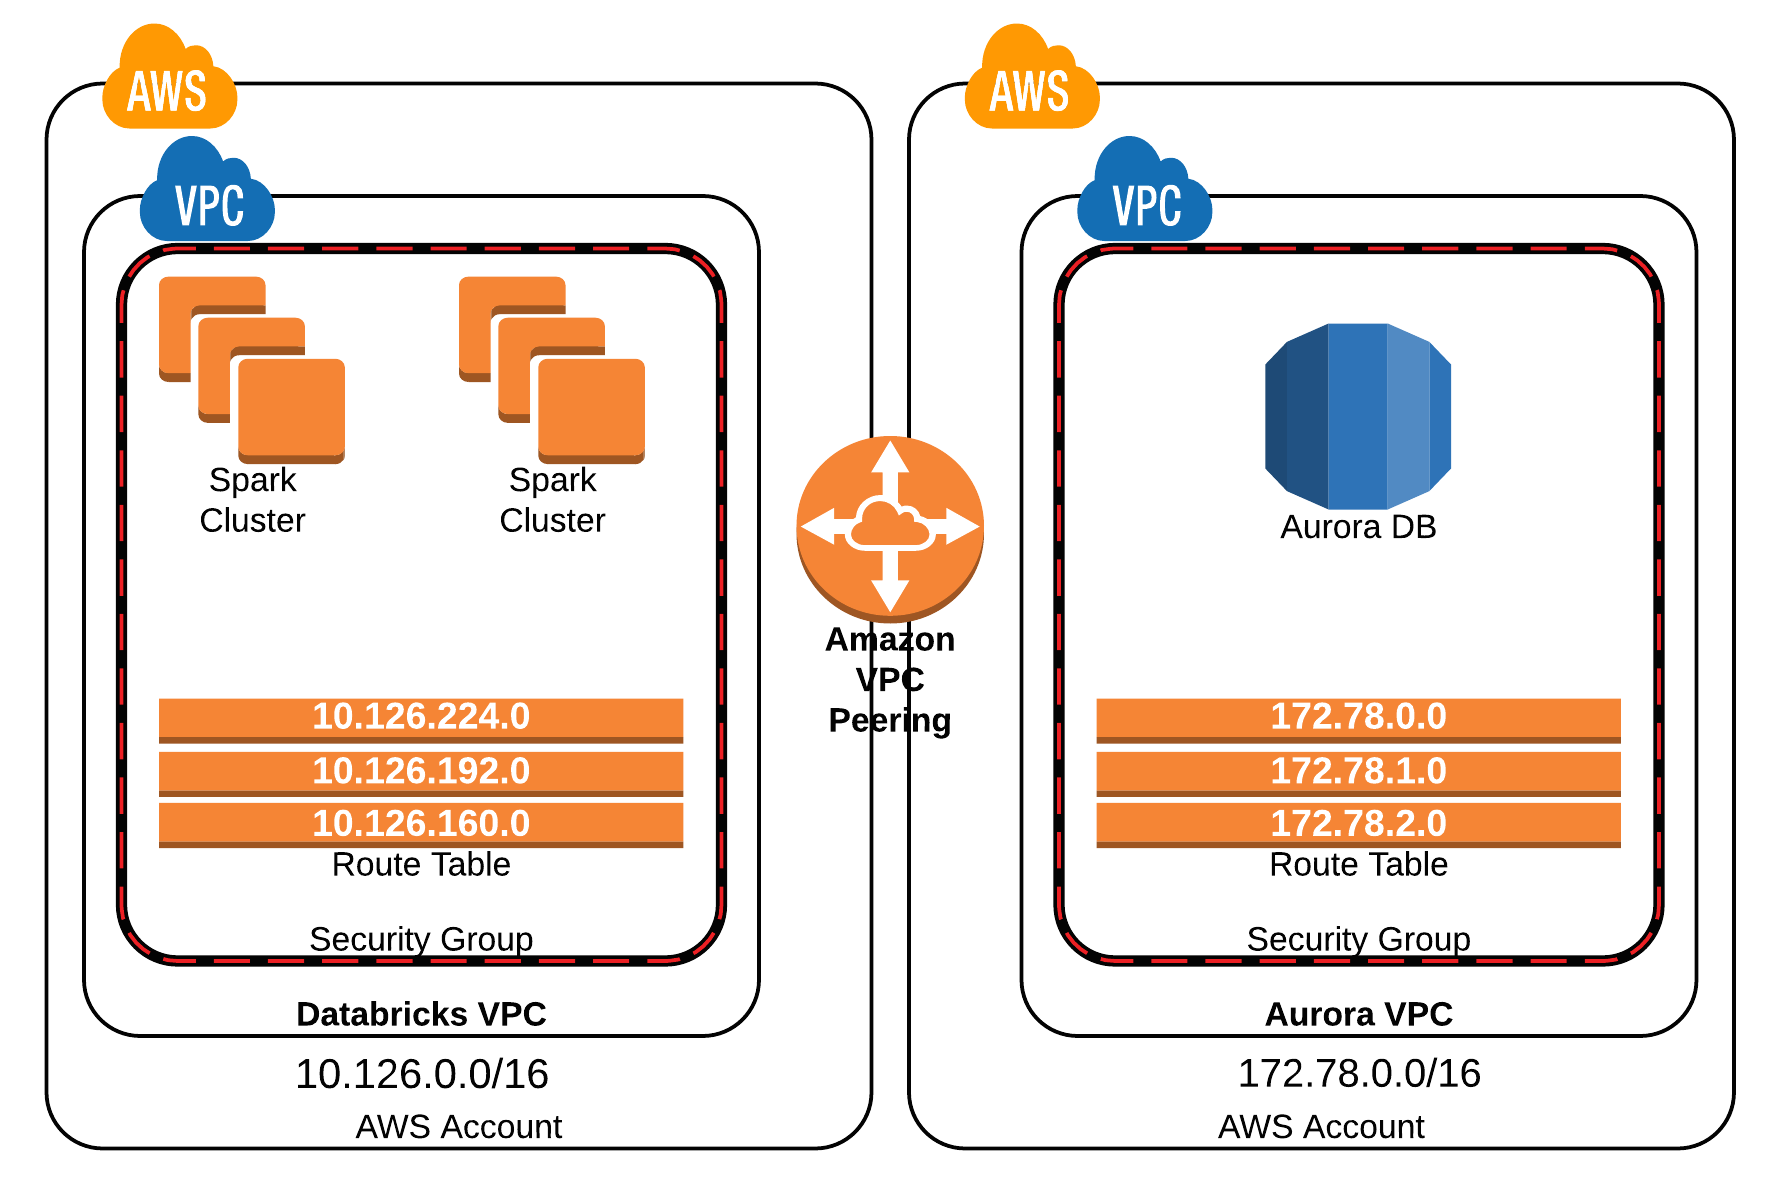
Amazon Web Services (AWS) provides robust Virtual Private Cloud (VPC) solutions that allow you to provision a logically isolated section of the AWS cloud where you can launch AWS resources in a virtual network that you define. Think of an AWS VPC as your own private, secure data center within the AWS cloud. You have complete control over your virtual networking environment, including selection of your own IP address range, creation of subnets, and configuration of route tables and network gateways. This isolation is critical for security, as it prevents unauthorized access to your IoT devices and data. Within your VPC, you can define strict security rules using Security Groups and Network Access Control Lists (NACLs) to control inbound and outbound traffic, ensuring that only authorized connections can reach your IoT infrastructure. Leveraging AWS VPC is a cornerstone of securely connecting your remote IoT devices, providing a highly configurable and scalable network backbone.
Secure Shell (SSH): The Gateway to Remote Access
Secure Shell (SSH) is a cryptographic network protocol for operating network services securely over an unsecured network. It's the standard method for securely connecting to remote Linux servers, including your Raspberry Pi. SSH provides strong authentication and encrypted communication between your Windows PC and your Raspberry Pi, protecting against eavesdropping, connection hijacking, and other network attacks. Instead of transmitting sensitive information like usernames and passwords in plain text, SSH encrypts all data exchanged, ensuring that your remote management commands and data transfers remain confidential. Mastering remote IoT VPC SSH with Raspberry Pi on AWS free Windows is essential for hands-on management, allowing you to execute commands, transfer files, and monitor performance—all from the comfort of your Windows machine. We'll focus on using SSH keys for authentication, which is far more secure than password-based logins.
Preparing Your Raspberry Pi for Remote IoT
First, you need to get your Raspberry Pi ready for remote access. This involves a few crucial steps to ensure it's both functional and secure from the outset. A stable internet connection for both your Raspberry Pi and Windows PC is fundamental for this entire process.
- Install Raspberry Pi OS: Start by flashing the latest version of Raspberry Pi OS (formerly Raspbian) onto an SD card. You can use tools like Raspberry Pi Imager, which is available for free download on Windows. Choose the "Lite" version if you don't need a graphical desktop environment, as it consumes fewer resources and is often preferred for headless IoT deployments.
- Enable SSH: For remote access, SSH must be enabled. You can do this in two primary ways:
- Before first boot: After flashing the OS, mount the SD card again on your Windows PC. Create an empty file named `ssh` (no extension) in the boot directory of the SD card. This will enable SSH on the first boot.
- After first boot (with monitor/keyboard): If you have physical access, boot the Pi, open a terminal, and run `sudo raspi-config`. Navigate to "Interface Options" -> "SSH" and enable it.
- Update and Upgrade: Once SSH is enabled and you can access your Pi (either physically or via SSH on your local network), update and upgrade its software packages to ensure you have the latest security patches and features.
sudo apt update sudo apt full-upgrade -y - Change Default Password (Crucial): If you didn't set a password during the initial setup, change the default 'raspberry' password immediately.
Follow the prompts to set a strong, unique password.passwd - Set up Static IP (Optional but Recommended for Local Network): While not strictly necessary for AWS VPC connectivity, assigning a static IP on your local network can simplify initial setup and local troubleshooting.
- Generate SSH Keys: For maximum security, we'll use SSH key pairs instead of passwords. On your Windows PC, you'll generate a public/private key pair. The public key will be placed on your Raspberry Pi, and the private key will remain securely on your Windows machine. This is a critical step in learning how to securely connect remote IoT VPC Raspberry Pi AWS download Windows, as it forms the basis of trust. We'll detail this in the Windows section.
By taking these preparatory steps, you're laying a solid foundation for a secure and manageable remote IoT device. Your Raspberry Pi is now ready to be connected to the wider world, but only through the secure channels we're about to establish.
Configuring AWS VPC for Secure IoT Communication
Connecting remote IoT devices securely to a Virtual Private Cloud (VPC) is a critical task for modern developers and IT professionals. AWS VPC provides the isolated environment needed to protect your IoT traffic. Here’s a step-by-step guide to setting up your VPC for Raspberry Pi connectivity:
- Create a New VPC:
- Log in to your AWS Management Console.
- Navigate to the VPC service.
- Click "Create VPC".
- Give it a meaningful name (e.g., `iot-raspberry-pi-vpc`).
- Choose an IPv4 CIDR block (e.g., `10.0.0.0/16`). This defines the IP address range for your private network.
- Keep other settings default for simplicity, then create.
- Create Subnets:
- Within your new VPC, create at least one public subnet. This subnet will contain resources that need to be accessible from the internet (like a NAT Gateway or an Internet Gateway).
- Choose an Availability Zone and an IPv4 CIDR block that's a subset of your VPC's CIDR (e.g., `10.0.1.0/24`).
- Enable "Auto-assign public IPv4 address" for this subnet if you plan to launch instances directly into it, though for our secure setup, we'll rely on a NAT Gateway.
- Create an Internet Gateway (IGW):
- An IGW allows communication between your VPC and the internet.
- Create a new IGW and attach it to your VPC.
- Configure Route Tables:
- Your VPC will have a default route table. You might create a custom one for your public subnet.
- Edit the route table associated with your public subnet to add a route for `0.0.0.0/0` (all internet traffic) pointing to your Internet Gateway. This allows resources in this subnet to communicate with the internet.
- Set Up a NAT Gateway (Recommended for Outbound Pi Traffic):
- For enhanced security, your Raspberry Pi devices should ideally reside in a private subnet and access the internet (e.g., for updates or sending data to AWS services) via a NAT Gateway.
- Create a NAT Gateway in your public subnet. It requires an Elastic IP address.
- Create a new private subnet (e.g., `10.0.2.0/24`) for your Raspberry Pi.
- Create a new route table for this private subnet and add a route for `0.0.0.0/0` pointing to your NAT Gateway. This allows your Pi to initiate outbound connections while preventing unsolicited inbound connections from the internet directly to the Pi.
- Create Security Groups:
- Security Groups act as virtual firewalls for your instances. You'll need one for your Raspberry Pi.
- Create a new Security Group (e.g., `raspberry-pi-sg`).
- Inbound Rules: Allow SSH (Port 22) only from your specific Windows PC's public IP address. This is critical for securely connecting your remote IoT VPC Raspberry Pi. Avoid `0.0.0.0/0` for SSH. If your IP changes, you'll need to update this rule.
- Outbound Rules: Typically, allow all outbound traffic (`0.0.0.0/0`) for your Pi to send data to AWS services and receive updates. You can restrict this further based on your specific needs.
- Launch a "Bridge" EC2 Instance (Optional but useful for complex setups):
- For truly remote Pi devices that can't be directly connected to the VPC via VPN or Direct Connect, you might launch a small EC2 instance (e.g., a T2.micro running Amazon Linux) within your VPC.
- This EC2 instance acts as a secure "jump box" or a VPN server that your remote Raspberry Pi can connect to. Your Windows PC would then SSH into this EC2 instance, and from there, SSH into your Pi. This adds another layer of security and network control.
- Ensure this EC2 instance's security group allows SSH from your Windows PC's IP and allows necessary traffic from your Pi.
This AWS VPC setup provides a robust, isolated network environment, ensuring that your Raspberry Pi devices communicate securely within your defined parameters. It's a foundational step in mastering how to securely connect remote IoT VPC Raspberry Pi AWS download Windows.
Establishing Secure SSH Connection from Windows
Now that your Raspberry Pi is configured and your AWS VPC is set up, the next crucial step is to establish a secure SSH connection from your Windows PC. This is where the "download Windows" aspect comes into play, referring to the necessary tools you'll acquire for your Windows environment. Mastering remote access to your Raspberry Pi, combined with virtual private cloud (VPC) security and Windows 10 downloads, is no longer a complex challenge, but a readily achievable goal.
- Download and Install an SSH Client on Windows:
- OpenSSH (Recommended for Windows 10/11): Modern versions of Windows 10 and 11 come with OpenSSH client pre-installed. You can verify its presence by opening PowerShell or Command Prompt and typing `ssh`. If it's not installed, you can add it via "Optional features" in Windows Settings. This is often the simplest and most integrated solution.
- PuTTY: A popular free SSH client for Windows. You can download PuTTY and PuTTYgen (for generating SSH keys) from its official website. This is a free download for Windows and widely used.
- Windows Subsystem for Linux (WSL): For a more Linux-like experience, you can install WSL (e.g., Ubuntu) and use its built-in OpenSSH client. This is an excellent option for those comfortable with Linux command lines.
- Generate SSH Key Pair (if you haven't already):
- Using OpenSSH (PowerShell/CMD):
Press Enter to accept the default file location (`C:\Users\YourUser\.ssh\id_rsa`) and set a strong passphrase for your private key.ssh-keygen -t rsa -b 4096 -C "your_email@example.com" - Using PuTTYgen: Open PuTTYgen, select "RSA" and set the number of bits to 4096. Click "Generate" and move your mouse randomly over the blank area to generate randomness. Save the public key (e.g., `id_rsa.pub`) and the private key (e.g., `id_rsa.ppk` for PuTTY).
- Using OpenSSH (PowerShell/CMD):
- Copy Public Key to Raspberry Pi:
- Once you have your public key (e.g., `id_rsa.pub`), you need to get it onto your Raspberry Pi. The most common way is to use `ssh-copy-id` (if using WSL or a Linux machine to initially connect) or manually copy it.
- Manual Copy (if first connection is password-based):
- SSH into your Raspberry Pi using its local IP address and the default password: `ssh pi@your_pi_local_ip`
- Create the `.ssh` directory if it doesn't exist: `mkdir -p ~/.ssh`
- Set correct permissions: `chmod 700 ~/.ssh`
- Open the `authorized_keys` file for editing: `nano ~/.ssh/authorized_keys`
- Paste the *contents* of your public key file (`id_rsa.pub`) into this file. Make sure it's all on one line.
- Save and exit (Ctrl+X, Y, Enter).
- Set correct permissions for `authorized_keys`: `chmod 600 ~/.ssh/authorized_keys`
- Disable password authentication (highly recommended for security): Edit `/etc/ssh/sshd_config`, find `PasswordAuthentication yes` and change it to `no`. Restart SSH service: `sudo systemctl restart ssh`.
- Connect from Windows to Raspberry Pi (via AWS VPC):
- If your Raspberry Pi is directly accessible via a public IP in your VPC (less secure, but possible for testing if security groups are strict), you can connect directly.
- More securely, if you're using a "jump box" EC2 instance in your VPC:
- First, SSH into your EC2 instance from Windows using its public IP and the EC2 instance's key pair.
ssh -i "path\to\your\ec2-key.pem" ec2-user@your_ec2_public_ip - From the EC2 instance, SSH into your Raspberry Pi using its private IP within the VPC and the Raspberry Pi's key pair (you'll need to copy the Pi's private key to the EC2 instance or use SSH agent forwarding).
ssh -i "path/to/your/pi-key.pem" pi@your_pi_private_ip
- First, SSH into your EC2 instance from Windows using its public IP and the EC2 instance's key pair.
- If your Pi is truly remote and connecting via a VPN/Direct Connect to your VPC, you'd connect directly to its private IP once the VPN tunnel is established.
- File Transfer (Securely Download Files to Windows):
- Once your Raspberry Pi is configured for remote access, you can use SSH to download files securely (meaning, files *from* your Pi *to* your Windows 10 PC).
- Using SCP (OpenSSH):
scp -i "path\to\your\pi-key.pem" pi@your_pi_ip:/path/to/remote/file.txt C:\path\to\local\destination\ - Using WinSCP (Free Download for Windows): WinSCP is a popular SFTP/FTP client for Windows. It provides a graphical interface, making file transfers intuitive. Download and install it, then configure a new session using your Raspberry Pi's IP, username (`pi`), and your private SSH key (`.ppk` if using PuTTYgen, or convert OpenSSH key to `.ppk`).
By following these steps, you've successfully established a secure, encrypted connection from your Windows machine to your remote Raspberry Pi, all routed through the robust security of your AWS VPC. This allows you to securely connect remote IoT VPC Raspberry Pi AWS download Windows tools and data, giving you full control over your IoT deployment.
Managing and Optimizing Your Remote IoT System
Once your secure connection is established, the next phase involves effectively managing and optimizing your remote IoT system. This isn't just about initial setup; it's about ensuring long-term reliability, performance, and continued security. With remoteIoT, you can securely connect to your Raspberry Pi devices via AWS, enabling you to execute commands, transfer files, and monitor performance—all from the convenience of your Windows PC.
- Regular Software Updates: Just as you update your Windows PC, it's crucial to keep your Raspberry Pi's operating system and installed software packages up-to-date. Regular updates patch security vulnerabilities and improve performance. Schedule routine `sudo apt update && sudo apt full-upgrade -y` commands.
- Resource Monitoring: Keep an eye on your Raspberry Pi's CPU usage, memory consumption, disk space, and network activity. Tools like `htop`, `df -h`, and `iftop` (installable via `sudo apt install htop iftop`) can provide real-time insights when you SSH in. If you're using AWS IoT Core, you can integrate device metrics for cloud-based monitoring.
- Logging and Alerting: Implement robust logging on your Raspberry Pi to capture system events, application errors, and security-related incidents. Consider forwarding these logs to AWS CloudWatch Logs for centralized storage and analysis. Set up CloudWatch Alarms to notify you (e.g., via email or SNS) of critical events like high CPU usage, low disk space, or unusual network activity.
- Automated Tasks and Scripts: Leverage cron jobs on your Raspberry Pi to automate repetitive tasks, such as data collection, data processing, or sending sensor readings to AWS IoT Core. This reduces manual intervention and ensures consistent operation.
- Power Management: For battery-powered or remote deployments, optimizing power consumption is vital. Disable unnecessary services, reduce CPU frequency if possible, and put the device to sleep when not actively processing data.
- Data Transfer Optimization: When sending data to AWS, consider using efficient protocols like MQTT (Message Queuing Telemetry Transport), which is lightweight and designed for IoT. AWS IoT Core natively supports MQTT. Compress data before transmission to reduce bandwidth usage and costs.
- AWS IoT Core Integration: For more advanced IoT management, integrate your Raspberry Pi with AWS IoT Core. This service provides device shadows, device registries, rules engines, and secure communication channels, allowing you to manage millions of devices, ingest data, and trigger actions based on that data. Your Raspberry Pi would publish data to specific MQTT topics, and AWS IoT Core rules would then route that data to other AWS services like S3, DynamoDB, or Lambda.
- Security Hardening (Beyond SSH):
- Firewall (UFW): Configure a simple firewall on your Raspberry Pi using UFW (Uncomplicated Firewall) to allow only necessary inbound connections (e.g., SSH from your VPC's private IP range or jump box IP, and outbound connections to AWS services).
- Fail2Ban: Install Fail2Ban to protect against brute-force SSH attacks by temporarily banning IP addresses with too many failed login attempts.
- Regular Security Audits: Periodically review your AWS Security Group rules, NACLs, and IAM policies to ensure they adhere to the principle of least privilege.
By diligently managing and optimizing your remote IoT system, you ensure its continued security, efficiency, and reliability. This proactive approach is key to harnessing the full power of your securely connected remote IoT VPC Raspberry Pi AWS download Windows setup.
Troubleshooting Common Secure Connection Issues
Even with the best planning, you might encounter issues when trying to securely connect remote IoT VPC Raspberry Pi AWS download Windows. Here are some common problems and their solutions:
- SSH Connection Refused/Timeout:
- Check Raspberry Pi Power/Network: Is the Pi powered on and connected to the network? Can you ping its IP address from your local network or EC2 jump box?
- SSH Service Running: On the Pi, verify SSH is running: `sudo systemctl status ssh`. If not, start it: `sudo systemctl start ssh`.
- Firewall on Pi: If you've enabled UFW on the Pi, ensure it's allowing SSH connections from your source IP. `sudo ufw status`. If not, `sudo ufw allow ssh`.
- AWS Security Group Inbound Rules: This is a very common culprit. Ensure your Pi's Security Group (or the EC2 jump box's SG) allows inbound SSH (port 22) traffic from your *current* public IP address. If your home IP changes, you'll need to update this rule.
- AWS NACL Rules: Network Access Control Lists are stateless firewalls at the subnet level. Ensure they permit SSH traffic (port 22 inbound and ephemeral ports outbound).
- Route Table Issues: If using a jump box, ensure the route table for the jump box's subnet has a route to the internet gateway. If your Pi is in a private subnet, ensure its route table points to the NAT Gateway for outbound internet access.
- Permission Denied (Public Key):
- Incorrect Key Path: Double-check the path to your private key (`-i` flag in SSH).
- Incorrect Key Permissions (Windows): On Windows, ensure your private key file has restricted permissions (only your user can read it). Right-click the file -> Properties -> Security -> Advanced. Disable inheritance and remove all users except your own.
- Incorrect Key Permissions (Pi): On the Raspberry Pi, ensure `~/.ssh` is `chmod 700` and `~/.ssh/authorized_keys` is `chmod 600`. The owner must be the user you're logging in as (`pi`).
- Public Key Mismatch: Ensure the public key on the Pi's `authorized_keys` file exactly matches the public key generated from your private key.
- Password Authentication Disabled: If you disabled password authentication on the Pi's `sshd_config`, you *must* use key-based authentication.
- "Host Key Verification Failed":
- This usually means the SSH client's record of the Pi's host key doesn't match what the Pi is presenting. This can happen if the Pi's OS was reinstalled or if there's a man-in-the-middle attack (less likely in a controlled environment).
- Solution: Remove the old host key entry from your Windows PC's `known_hosts` file. For OpenSSH, this file is typically at `C:\Users\YourUser\.ssh\known_hosts`. Open it with a text editor and delete the line containing the Pi's IP address or hostname.
- Slow Performance/Lag:
- Network Latency: Check your internet connection speed and latency to AWS regions.
- Raspberry Pi Resource Usage: Use `htop` on the Pi to check if CPU or memory are maxed out by other processes.
- Bandwidth Throttling: Ensure your AWS EC2 instance type (if using a jump box) or network configuration isn't throttling bandwidth.
- Problems with File Transfers (SCP/WinSCP):
- Permissions: Ensure the user you're connecting as (`pi`) has read/write permissions to the source/destination directories on the Raspberry Pi.
- Disk Space: Check if the Pi's SD card is full (`df -h`).
- Firewall: Ensure no firewall on the Pi or AWS is blocking the data transfer ports (SCP/SFTP use the same port as SSH, 22).
By systematically checking these common areas, you can efficiently diagnose and resolve most secure connection issues, ensuring your ability to securely connect remote IoT VPC Raspberry Pi AWS download Windows remains unhindered.
Future-Proofing Your IoT Security Posture
In today's digital age, securely connecting your remote IoT VPC Raspberry Pi AWS download on Windows means setting up a secure network connection between your Raspberry Pi device and an AWS Virtual Private Cloud. However, the threat landscape is constantly evolving, so merely setting up a secure connection isn't enough; you must also future-proof your IoT security posture. This involves adopting ongoing best practices and staying informed about emerging threats and technologies
Secure Remote IoT VPC & AWS: Raspberry Pi Guide & Best Practices

Securely Connect Remote IoT VPC Raspberry Pi On AWS

Securely Connect Remote IoT VPC Raspberry Pi Download Free: A
